A well-stocked science room gives students the chance to observe, measure, compare, and think like scientists. One of the most important parts of that setup is dependable lab glassware, which supports everything from basic demonstrations to hands-on experiments. For educators, choosing the right glassware is not just about filling cabinets with beakers and flasks. It is about building a safe, organized, and flexible learning environment. When students have access to the correct tools, they can better understand scientific concepts through real-world practice. The right glassware also helps teachers run labs more smoothly, reduce waste, and protect students from avoidable accidents.
Why Lab Glassware Matters in the Classroom
Lab glassware helps students move beyond textbook learning and into active discovery. Whether they are measuring liquids, heating solutions, observing reactions, or comparing samples, glassware gives structure to the experiment. It also teaches students how to handle scientific tools carefully and follow precise procedures. These skills are valuable in chemistry, biology, environmental science, and physical science classrooms. Even simple activities, such as mixing colored water or measuring volume, can help students build confidence with lab routines. For educators, dependable glassware makes it easier to plan lessons that are both engaging and safe.
Quality glassware also improves accuracy during classroom experiments. While many school labs use plastic materials for younger students, glass is often better for heat resistance, chemical compatibility, and clear observation. Students can see reactions more easily through transparent glass, which supports stronger visual learning. Glassware is also reusable when cleaned and stored properly, making it a practical long-term investment. In upper-grade science rooms, students need experience with tools that resemble those used in real laboratories. Introducing proper lab glassware helps prepare them for advanced science courses and future STEM pathways.
Essential Lab Glassware Every Science Room Should Have
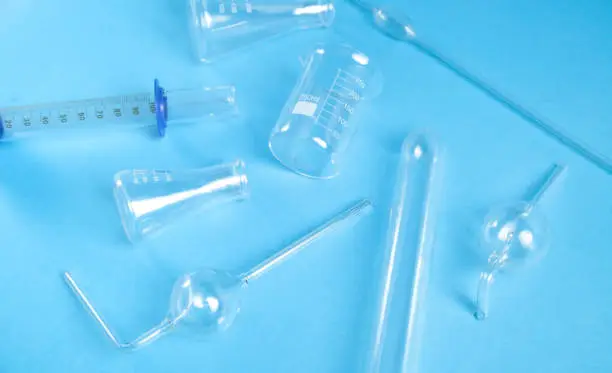
Every science room should begin with the basics. Beakers are among the most versatile pieces of glassware because they can hold, mix, heat, and pour liquids. Graduated cylinders are essential for measuring liquid volume more accurately than a beaker can. Erlenmeyer flasks are useful for swirling liquids without spilling, making them ideal for mixing and titration-style activities. Test tubes allow students to work with small samples, observe reactions, and compare results side by side. Watch glasses, stirring rods, funnels, and droppers also support common classroom procedures.
A practical starter collection of lab glassware may include:
- Beakers in multiple sizes, such as 50 mL, 100 mL, 250 mL, and 500 mL
- Graduated cylinders for accurate volume measurement
- Erlenmeyer flasks for mixing, heating, and swirling solutions
- Test tubes with racks for small-scale reactions
- Glass stirring rods for mixing liquids safely
- Funnels for controlled pouring and filtration
- Watch glasses for evaporation, covers, or small samples
- Pipettes or droppers for transferring small liquid amounts
Teachers should select glassware based on grade level, curriculum needs, class size, and storage space. A middle school classroom may need durable, basic pieces for introductory activities. A high school chemistry room may need a broader selection, including volumetric flasks, burettes, and more specialized measuring tools. Buying glassware in classroom sets can help ensure consistency across lab groups. It is also helpful to keep extra pieces on hand because breakage will happen over time. Planning ahead prevents one broken beaker from disrupting an entire lesson.
Choosing the Right Type of Glassware
Not all classroom glassware is the same, and educators should know the differences before purchasing. Borosilicate glass is often preferred for science labs because it resists thermal shock better than ordinary glass. This means it is less likely to crack when heated or cooled under normal lab conditions. Soda-lime glass is less expensive, but it is typically better suited for storage or activities that do not involve heating. Tempered glass may offer additional strength, but it is not always appropriate for every chemical or heating use. Always check the product description and safety guidance before using any glassware in an experiment.
Educators should also consider whether the glassware needs measurement markings. Beakers and Erlenmeyer flasks often have approximate volume markings, but they are not designed for precise measurements. Graduated cylinders, burettes, pipettes, and volumetric flasks are better choices when accuracy matters. For demonstrations, rough measurement may be enough, but student investigations often require better precision. Choosing the right tool teaches students that scientific equipment has specific purposes. This helps prevent sloppy data collection and supports stronger lab habits.
Durability is another key factor for school environments. Students are still learning proper handling, so glassware should be strong enough for frequent classroom use. Thick-walled beakers and reinforced rims may help reduce breakage during routine activities. However, educators should not assume that thicker glass is always safer for heating. Heat-safe lab glassware should be clearly labeled for that purpose. When in doubt, consult the supplier’s specifications or choose equipment specifically designed for educational laboratories.
Safety and Handling Best Practices
Safety should guide every decision about lab glassware. Students should be taught how to carry glassware with two hands, keep it away from the edge of the table, and inspect it before use. Any piece with chips, cracks, sharp edges, or cloudy stress marks should be removed immediately. Broken glass should never be picked up with bare hands. Instead, educators should use a brush, dustpan, tongs, or a designated broken-glass disposal container. Clear routines reduce panic and help students respond responsibly when accidents happen.
Before using glassware with heat, students need clear instructions. They should know that hot glass looks the same as cool glass, which makes burns a common risk. Heat-resistant gloves, tongs, wire gauze, and proper stands should be available when heating is part of the lesson. Glassware should never be sealed while heating because pressure can build and cause dangerous breakage. Teachers should also remind students not to rapidly cool hot glass unless the glassware is designed for that treatment. These small reminders can prevent many classroom lab injuries.
Chemical safety is equally important. Educators should make sure the selected glassware is compatible with the chemicals used in the lesson. Students should label containers clearly and avoid mixing unknown substances. Food and drink should never be allowed near lab glassware, even if the activity seems harmless. Glassware used for science should not be repurposed for eating, drinking, or classroom decorations that may confuse students. Strong safety culture begins with consistent expectations.
Cleaning, Storage, and Organization
Clean lab glassware supports accurate results and safer experiments. Residue from previous activities can contaminate samples, change results, or cause unexpected reactions. Students should rinse glassware promptly after use and follow the teacher’s cleaning instructions. Some materials may require soap and water, while others may need special disposal steps before washing. Glassware should be completely dry before storage to prevent water spots, odors, and contamination. Teachers should inspect cleaned items regularly to make sure they are ready for the next class.
A strong organizational system saves time and reduces breakage. Store glassware by type and size so students can find what they need quickly. Use labeled shelves, bins, or cabinets to keep materials from becoming mixed together. Test tubes should be stored in racks or containers that prevent rolling. Larger items, such as flasks and beakers, should be placed where they are easy to reach without stretching over other supplies. Heavy glassware should be stored low enough to lift safely.
It is also helpful to create a checkout or inventory system for shared lab materials. Teachers can track which items are used most often and identify when replacements are needed. Inventory checks can be done monthly, quarterly, or before major lab units. Keeping a simple spreadsheet with item names, quantities, sizes, and condition notes can make ordering easier. This also helps department heads plan budgets more accurately. Organized lab glassware helps the entire science program run more efficiently.
FAQ: Lab Glassware for Educators
What lab glassware should every classroom have first?
Start with beakers, graduated cylinders, Erlenmeyer flasks, test tubes, stirring rods, funnels, and droppers. These items support the widest range of basic science activities.
Is glassware safe for middle school students?
Yes, when students receive clear instructions, and the teacher chooses age-appropriate activities. For younger students or high-movement activities, plastic alternatives may be safer.
What is the best glass for heating experiments?
Borosilicate glass is commonly preferred for heating because it handles temperature changes better than regular glass. Always confirm that the item is labeled heat-resistant.
Can beakers be used for accurate measurements?
Beakers are useful for rough measurements, but they are not the best choice for precision. Graduated cylinders and volumetric tools are better for accurate volume readings.
How should broken lab glassware be handled?
Students should alert the teacher immediately and avoid touching broken glass. Use proper cleanup tools and dispose of shards in a designated broken-glass container.
How often should classroom glassware be replaced?
Replace glassware whenever it is chipped, cracked, scratched, weakened, or no longer readable. Regular inspections help prevent unsafe equipment from staying in use.
Building a Practical Glassware Plan
Educators do not need to buy every possible item at once. A smart approach is to start with versatile pieces and expand based on the curriculum. Review upcoming units and list the experiments students will complete during the year. Then match each activity to the required glassware, quantities, and safety tools. This prevents overbuying while making sure key lessons are fully supported. A thoughtful plan also makes it easier to justify purchases during budget discussions.
Class size should play a major role in planning. If students work in groups of four, a class of 32 may need at least eight complete sets of common glassware. Teachers may also want extra pieces for demonstrations, damaged items, and unexpected needs. Standardizing sizes can simplify storage and cleanup. For example, using the same beaker sizes across multiple labs makes setup faster. Consistency also helps students become familiar with the tools they use most often.
Final Thoughts for Educators
The right lab glassware can make a science room safer, more organized, and more engaging for students. Beakers, flasks, cylinders, test tubes, and other essential tools help turn abstract concepts into hands-on learning experiences. When educators choose durable, appropriate glassware and teach students how to use it responsibly, they support both safety and scientific thinking. Good storage, cleaning, and inventory habits also protect the school’s investment over time. A well-planned glassware collection does not just serve one lesson or one grade level. It becomes the foundation for years of meaningful science exploration.